This is default featured slide 1 title

Go to Blogger edit html and find these sentences.Now replace these sentences with your own descriptions.This theme is Bloggerized by Lasantha Bandara - Premiumbloggertemplates.com.

This is default featured slide 2 title

Go to Blogger edit html and find these sentences.Now replace these sentences with your own descriptions.This theme is Bloggerized by Lasantha Bandara - Premiumbloggertemplates.com.

This is default featured slide 3 title

Go to Blogger edit html and find these sentences.Now replace these sentences with your own descriptions.This theme is Bloggerized by Lasantha Bandara - Premiumbloggertemplates.com.

This is default featured slide 4 title

Go to Blogger edit html and find these sentences.Now replace these sentences with your own descriptions.This theme is Bloggerized by Lasantha Bandara - Premiumbloggertemplates.com.

This is default featured slide 5 title

Go to Blogger edit html and find these sentences.Now replace these sentences with your own descriptions.This theme is Bloggerized by Lasantha Bandara - Premiumbloggertemplates.com.

Showing posts with label Troubleshoot. Show all posts

Thursday, April 15, 2010

Websites Asks To Press F1 Key ? DON’T PRESS IT

Microsoft has been reported of a vulnerability discovered in Windows operating systems Windows XP, Windows 2000 and Windows Server 2003 which exploits the VB Script. Microsoft has recently released an Advisory named “Microsoft Security Advisory (981169)”

As per the advisory there is a vulnerability that if a user presses F1 Key on being asked by a Website or webpage, the website can run potentially malicious code or scrip on such computers. That computer can get hacked, information can be stolen or it may also lead to data theft.

It is an advice to all our readers and Windows XP, Windows 2002 and Windows 2003 Server users to beware of this vulnerability and do not press the F1 Key when asked by a website. This may leave your computer unsecured or infected with virus or trojans.

Even if you are a Windows Vista User or Windows 7 or Windows Server 2008 user, its a safety tip to not click F1 Key when asked by a website.

Tuesday, October 27, 2009

How To Solve "There Are No Active Mixer Devices Available" Error Message in Windows?

Solution 1:

Go to Start > Run and type in: services.msc , and hit enter.Scroll down to "Windows Audio", right-click on it and select Properties, set the startup type to Automatic, click Apply and then click the Start button.

Solution 2:

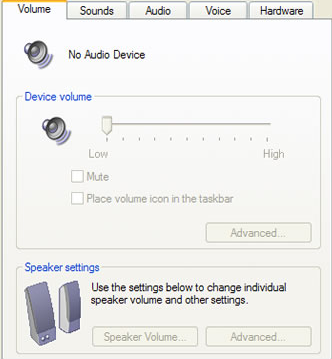
Computer was giving the error “no active mixer devices available” whenever they clicked on the volume icon in their task bar. This problem came up out of nowhere and it was almost of if the computer never had sound before! In the Sound and Audio Devices applet in Control Panel, everything was grayed out and there was a message saying “No audio device” under the Volume tab
Upon checking under the Hardware section via the System Properties, we found a couple of yellow exclamation points next to Multimedia Audio Controller. Now this issue would have been easy to fix if the computer had a separate sound card installed and would have simply involved downloading and re-installing the latest drive for the card. Sometimes the driver becomes corrupt and the sound disappears. In this case, just go to Dell, HP, or your manufacture’s web site and download the audio drivers.
However, if your sound card is integrated into your motherboard, you’ll have to re-install the motherboard sound drivers. This is a little trickier because you need to first find the make and model of your motherboard. You can figure out the model of your motherboard in three ways:

1. Open the computer and find the sticker or embedded name of the manufacturer. Be sure it’s not the maker of the chipset, as that will not help.

2. Everest software – a free app that will help you identify your motherboard.

3. Belarc Advisor – Another nifty little app that will give you a crap load of information about your computer including the motherboard.

Once you have the model information, you’ll need to perform a search for the number or try to go to the web site of the maker. Find your driver, install it and restart the computer. You should now have your sound back!
Any questions, post a comment!

Monday, September 7, 2009

How To Delete/Remove Khatra.exe/Xplorer.exe/gHost.exe Virus from Your Computer?

This virus has some symptoms when ever you try to open browser and search remove khatra.exe the browser will automatically close, you can’t not delete khatra.exe or gHost.exe or Xplorer.exe which are created by the same virus as these processes will keep running.

Let’s discuss the removal procedure to delete khatra.exe or gHost.exe or Xplorer.exe virus

Fix:

Follow the procedure below

1. Open Task Manager but if task manager is blocked then unblock task manager and click the process tab, found these process named regsvr.exe(if found there), gHost.exe, khatra.exe and Xplorer.exe, right click on all these process and select end process tree

2. Open Start Menu >> Run, type cmd and click Ok button

3. Now download and install everything search tool

4. Run Everything and type the virus exe names one by one ( khatra.exe, gHost.exe, Xplorer.exe ) and delete all the copies found on your computer anywhere.

5. Now Open start menu >> run, type regedit

6. Press ctrl+f and find the registry keys with names khatra,gHost,Xplorer and delete the values you find with these names.

Windows Explorer.exe Does Not Load\Run

This type of problem occurs when your computer get infected from the virus or spyware which has corrupted some registry keys which are related to explorer load.

Here is how you can fix this issue:

Fix:

Follow the procedure below

1. Press Ctrl+Shift+Esc to launch task manager

2. Click File | New Task

3. Now type regedit and click Ok

4. Browse the following registry path

HKEY_LOCAL_MACHINESOFTWAREMicrosoft
Windows NTCurrentVersionImage File Execution.options

5. Under this registry path, you will see subkeys named explorer.exe and iexplorer.exe.
These keys must be pointing to files created by the virus that have been removed (virus/spyware); explorer32dbg.exe and iexplore_dbg.exe.

6. Delete the explorer and iexplorer keys entirely.

7. Close Registry and restart your computer

We hope this procedure given above will help you fix the problem, if it does not let us know through comments.

Sunday, September 6, 2009

Cannot Uninstall Yahoo Messenger

It is a very common trouble when many users encounter errors while they try to uninstall yahoo messenger on their computers, some of them see the installation log missing, some cannot see yahoo messenger entry in add remove program and some others errors while removing older version of yahoo messenger on your computer.

There can be different reasons for different people for which they want to uninstall yahoo messenger on their computers. Some common reasons are mentioned given below:

* You cannot log on to yahoo messenger installed.
* Messenger does not start because of damaged or corrupted installation files.
* You may want to upgrade to the latest version of Yahoo Messenger.
* You cannot send and receive messages.
* It is degrading system performance.
* you are using some other messenger for online chatting.

Here is how to fix all the issues faced and completely remove and delete yahoo messenger from your computer.

Fix:

You can follow the the first manual method to remove yahoo messenger, you can skip this method if you have already tried.

1. Log out of Yahoo Messenger and close yahoo messenger completely [ it should not be running under task manager as a process ].
2. Open Start Menu >> Control Panel.
3. Double-click on Add or Remove Programs.
4. Locate Yahoo Messenger in Add or Remove Programs.
5. Click Change/Remove button.
6. Restart your computer, if it doesn’t restart it automatically.
7. Open Yahoo folder in Program Files (C:\Program Files\Yahoo) and delete it.
8. Open registry through Start Menu >> Run and type regedit now navigate to the HKEY_CURRENT_USER\ Software\ registry entry, delete Yahoo, and exit the Registry.

If the above method does not work for you, try the following methods to solve the problem.

1. Open Program Files >> Yahoo Messenger and find the file UNWISE.exe file. Double click this to run it. This will un install yahoo messenger.

2. Download Revo Uninstaller and uninstall Yahoo messenger with revo un installer.

3. You can also try downloading the newer version and install it directly which might the solve the problem in your case.

4. At last, you can delete the Yahoo Messenger folder on your own. Follow the following path in xp i.e My Computer>>C: drive>>Program Files>>Yahoo>>Messenger.

We are sure at least one of the method must have worked in your case, let us know if you still face any issues after following all these methods and not able to install yahoo messenger.

Sunday, August 16, 2009

What To Do If Your PC Is Taking Much Time To Shutdown?

Does your system take a lot of time to shutdown? If yes, follow the tips listed below to speed up system shutdowns.

Close All Running Programs

When you give the command to shutdown Windows, the shutdown process first closes down all applications and processes running on it and then shuts down itself. Therefore, if your system is slow in shutting down, it is recommended that you first close all programs running on the computer and displayed in the system tray and then give the shutdown command.

Resolve Problems Related to Buggy and Outdated Drivers

Buggy and outdated device drivers may also cause problems during system shutdown. To see if there are problems with device drivers on your computer, do the following:

1. Open the Start menu, select Control Panel, and then select System.
2. On the Hardware tab, click Device Manager.
3. In the Device Manager window, look for the following items:
* Items that are marked with red exclamation marks: This implies that the device is not working.
* Items that are marked with yellow question marks: This indicates that Windows is using a generic driver for the device instead of the device-specific driver.

Quite often, you can resolve the problem by updatingthe driver files. To do this, in the Device Manager window, right-click on the device entry for which you need to update the driver, and then select Update Driver. Next, follow the wizard to upgrade the driver for your device.

Note: You may need to download the updated driver files from the device manufacturer’s web site on your computer before running the wizard.

Terminate Terminal Services

If terminal services such as remote desktop, remote assistance, and fast user switching or any other terminal services that you do not require are enabled on your computer, they may unnecessarily slow down the shutdown process. To prevent these slowdowns, you may disable the Terminal Server service. To do this, at Start > Run, type services.msc and then press Enter. Browse down and double-click on Terminal Services in the Services window, click stop and then change Startup type to Disabled.

Reduce Shutdown Wait Time

When you give the shutdown command, the shutdown process gives some wait time to all programs currently running on the system to shutdown normally. To speed up the shutdown process, you may reduce this wait time. To do this, perform the following steps:

Open Start menu, select Run, type regeditand then press Enter. In the Registry Editor window, navigate to the following registry key:

HKEY_LOCAL_MACHINE\SYSTEM\CurrentControlSet\Control

In the right-pane double-click WaitToKillServiceTimeout. In the Value data field, change the default value of 2000 meaning 2 seconds of wait time to something lower, say 1000 or 1 second. After you are done, click OK to implement your changes, exit the Registry Windows and then restart your computer.

Warning: The registry is a critical component of your Windows computer. Therefore, before making any direct edits to it, you must make a backup. You can make a registry backup either by using the Export option in Registry Editor or by using the backup and restore feature of a reliable registry cleaner tool.

Hibernate Your PC

Unless something goes wrong with your PC, there is no need to shutdown your XP computer for weeks. So, instead of completely shutting down the system, you can opt to put it to sleep by hibernating it. When you choose to hibernate your PC, all information in the RAM of your computer is written to the disk and the computer is turned down. From a hardware point both shutdown and hibernate processes are identical, but the benefit of hibernating is that it enables much faster system shutdown and startups. What’s more, when your PC comes up from hibernation it displays all the Windows you were working on before you hibernated the system, saving you more time in opening them again.

In addition to these tasks, you may perform a certain amount of preventive maintenance of your system to keep it free from unwanted junk data. Some of the important tools that can help you maintain a healthy PC are registry cleaner, antivirus, antispyware, Disk Cleanup, and Disk Defragmenter.

Sunday, August 9, 2009

How To Remove Newfolder.exe Virus?

What is Newfolder.exe?

The real name of this virus is Iddono. This threat copies its file(s) to your hard disk. Its typical file name is Iddono. Then it creates new startup key with name Iddono and value newfolder.exe. You can also find it in your processes list with name newfolder.exe or Iddono.This virus is very difficult to eliminate manually, but you can find solution for removal below.


For Auto Scan
Click This

Manual Solution:

Step1:
1. Search for autorun.inf file. It is a read only file so you will have to change it to normal by right clicking the file , selecting the properties and un-check the read only option
2. Open the file in notepad and delete everything and save the file.
3. Now change the file status back to read only mode so that the virus could not get access again.
4. Autorun
5. Click start->run and type msconfig and click ok
6. Go to startup tab look for regsvr and uncheck the option click OK.
7. Click on Exit without Restart, cause there are still few things we need to do before we can restart the PC.
8. Now go to control panel -> scheduled tasks, and delete the At1 task listed there.

Step2:
1. Click on start -> run and type gpedit.msc and click Ok.
2.
3. If you are Windows XP Home Edition user you might not have gpedit.msc in that case download and install it from Windows XP Home Edition: gpedit.msc and then follow these steps.
4. Go to users configuration->Administrative templates->system
5. Find “prevent access to registry editing tools” and change the option to disable.
6. Opening the gate of castle: Group Edit Policies
7. Once you do this you have registry access back.

Step3:
1. Click on start->run and type regedit and click ok
2. Go to edit->find and start the search for regsvr.exe,
3. Launch the attack in the heart of castle: registry search
4. Delete all the occurrence of regsvr.exe; remember to take a backup before deleting. KEEP IN MIND regsvr32.exe is not to be deleted. Delete regsvr.exe occurrences only.
5. At one ore two places you will find it after explorer.exe in theses cases only delete the regsvr.exe part and not the whole part. E.g. Shell = “Explorer.exe regsvr.exe” the just delete the regsvr.exe and leave the explorer.exe

Step4:
1. Click on start->search->for files and folders.
2. Their click all files and folders
3. Type “*.exe” as filename to search for
4. Click on ‘when was it modified ‘ option and select the specify date option
5. Type from date as 1/31/2008 and also type To date as 1/31/2008
6. Seek and destory enemy soldiers: the search option
7. Now hit search and wait for all the exe’s to show up.
8. Once search is over select all the exe files and shift+delete the files, caution must be taken so that you don’t delete the legitimate exe file that you have installed on 31st January.
9. Also selecting lot of files together might make your computer unresponsive so delete them in small bunches.
10. Also find and delete regsvr.exe, svchost .exe( notice an extra space between the svchost and .exe)

Step5:
1. Now do a cold reboot (ie press the reboot button instead) and you are done.

Tuesday, August 4, 2009

How To Fix WMP.dll Error Message?

An error message similar to the one given below may be displayed on your computer screen when you try to open Windows Media Player on your computer:The file wmp.dll has a version number of 9.0.0.3075 where 9.0.0.2980 was expected. Windows Media Player is not installed properly and must be reinstalled.You may not be able to fix the error even by reinstalling the Media Player and the error message may display when you try to launch the application soon after re-installation.
To resolve this issue, open Start menu, select Run, type the following error message, and then press Enter.

C:\windows\inf\unregmp2.exe /UpdateWMP

Performing this task may fix the confusion regarding Media Player version numbers and resolve the error message.At times, an error message similar to the one given below may appear on your computer screen when you try to play a video file on your Media Player:Explorer has caused a problem in wmp.dll.

To resolve this issue,open Start menu, select Run, type the following command, and then press Enter.

regsvr32 wmp.dll

Performing this step will register the wmp.dll file on your system and resolve the issue.

There can be several causes of missing or corrupt files on your computer, including incorrect program installation\removal, faulty programs and device drivers, malware infections, a damaged registry, and malfunctioning hardware.

To prevent these problems, you must never download and install programs from unreliable Web sites. You must always keep your operating system and other software updated with the latest releases from their manufacturers. It is essential to perform regular antivirus and antispyware scans using reliable and updated tools.Last but not least, it is important for you to maintain a healthy registry with the help of a reliable registry cleaner tool, such as Register Winner

Saturday, August 1, 2009

XP Not Booting And Last Known Good Configuration does not work

If booting from Last Known Good Configuration does not work, and if a Windows XP repair does not work,here is another option, I have been successful everytime repairing a hung windows XP.

If the file system is fat32, you can boot with a Windows 98 boot disk and do the following.

If the file system is NTFS, boot with the Windows XP CD to recovery console (you will need to know the administrator password) and do the following.

I have been successful in getting windows to boot by just replacing the system file, so you might want to try that first. You may end up having to re-install a few programs after the boot is successful

If the copying in the system file does not work, then do these
Note:these files, system,software,sam,security & default do not have file extensions to them.

from c:\windows md tmp
copy C:\windows\system32\config\system C:\windows\tmp\system.bak
copy C:\windows\system32\config\software C:\windows\tmp\software.bak
copy C:\windows\system32\config\sam C:\windows\tmp\sam.bak
copy C:\windows\system32\config\security C:\windows\tmp\security.bak
copy C:\windows\system32\config\default C:\windows\tmp\default.bak
delete C:\windows\system32\config\system
delete C:\windows\system32\config\software
delete C:\windows\system32\config\Sam
delete C:\windows\system32\config\security
delete C:\windows\system32\config\default
copy C:\windows\repair\system C:\windows\system32\config\system
copy C:\windows\repair\software C:\windows\system32\config\software
copy C:\windows\repair\sam C:\windows\system32\config\sam
copy C:\windows\repair\security C:\windows\system32\config\security
copy C:\windows\repair\default C:\windows\system32\config\default

10 Things You Can Do When Windows XP Won't Boot

When your computer hardware appears to power up okay, but the Windows XP operating system won't boot properly, you have to begin a troubleshooting expedition that includes getting into the operating system, determining the problem, and then fixing it. To help you get started on this expedition, here are 10 things you can do when Windows XP won't boot.

#1: Use a Windows startup disk

One of the first things you should reach for when troubleshooting a Windows XP boot problem is a Windows startup disk. This floppy disk can come in handy if the problem is being caused when either the startup record for the active partition or the files that the operating system uses to start Windows have become corrupted.

To create a Windows startup disk, insert a floppy disk into the drive of a similarly configured, working Windows XP system, launch My Computer, right-click the floppy disk icon, and select the Format command from the context menu. When you see the Format dialog box, leave all the default settings as they are and click the Start button. Once the format operation is complete, close the Format dialog box to return to My Computer, double-click the drive C icon to access the root directory, and copy the following three files to the floppy disk:

* Boot.ini
* NTLDR
* Ntdetect.com

After you create the Windows startup disk, insert it into the floppy drive on the afflicted system and press [Ctrl][Alt][Delete] to reboot the computer. When you boot from the Windows startup disk, the computer will bypass the active partition and boot files on the hard disk and attempt to start Windows XP normally.

#2: Use Last Known Good Configuration

You can also try to boot the operating system with the Last Known Good Configuration feature. This feature will allow you to undo any changes that caused problems in the CurrentControlSet registry key, which defines hardware and driver settings. The Last Known Good Configuration feature replaces the contents of the CurrentControlSet registry key with a backup copy that was last used to successfully start up the operating system.

To use the Last Known Good Configuration feature,first restart the computer by pressing [Ctrl][Alt][Delete]. When you see the message Please select the operating system to start or hear the single beep, press [F8] to display the Windows Advanced Options menu. Select the Last Known Good Configuration item from the menu and press [Enter].

Keep in mind that you get only one shot with the Last Known Good Configuration feature. In other words, if it fails to revive your Windows XP on the first attempt, the backup copy is also corrupt.

#3: Use System Restore

Another tool that might be helpful when Windows XP won't boot is System Restore. System Restore runs in the background as a service and continually monitors system-critical components for changes. When it detects an impending change, System Restore immediately makes backup copies, called restore points, of these critical components before the change occurs. In addition, System Restore is configured by default to create restore points every 24 hours.

To use System Restore, first restart the computer by pressing [Ctrl][Alt][Delete]. When you see the message Please select the operating system to start or hear the single beep, press [F8] to display the Windows Advanced Options menu. Now, select the Safe Mode item from the menu and press [Enter].

Once Windows XP boots into Safe mode, click the Start button, access the All Programs | Accessories | System Tools menu, and select System Restore. Because you're running in Safe mode, the only option on the opening screen of the System Restore wizard is Restore My Computer To An Earlier Time, and it's selected by default, so just click Next. Then, follow along with the wizard to select a restore point and begin the restoration procedure.

#4: Use Recovery Console

When a Windows XP boot problem is severe, you'll need to use a more drastic approach. The Windows XP CD is bootable and will provide you with access to a tool called Recovery Console.

To boot from the Windows XP CD, insert it into the CD-ROM drive on the problem system and press [Ctrl][Alt][Delete] to reboot the computer. Once the system begins booting from the CD, simply follow the prompts that will allow the loading of the basic files needed to run Setup. When you see the Welcome To Setup screen, shown in Figure A, press R to start the Recovery Console.

Figure A


You'll then see a Recovery Console menu, like the one shown in Figure B. It displays the folder containing the operating system's files and prompts you to choose the operating system you want to log on to. Just press the menu number on the keyboard, and you'll be prompted to enter the Administrator's password. You'll then find yourself at the main Recovery Console prompt.

Figure B


#5: Fix a corrupt Boot.ini

As the Windows XP operating system begins to load, the Ntldr program refers to the Boot.ini file to determine where the operating system files reside and which options to enable as the operating system continues to load. So if there's a problem rooted in the Boot.ini file, it can render Windows XP incapable of booting correctly.

If you suspect that Windows XP won't boot because Boot.ini has been corrupted, you can use the special Recovery Console version of the Bootcfg tool to fix it. Of course, you must first boot the system with the Windows XP CD and access the Recovery Console as described in #4.

To use the Bootcfg tool, from the Recovery Console command prompt, type

Bootcfg /parameter

Where /parameter is one of these required parameters:

* /Add--Scans the disk for all Windows installations and allows you to add any new ones to the Boot.ini file.
* /Scan--Scans the disk for all Windows installations.
* /List--Lists each entry in the Boot.ini file.
* /Default--Sets the default operating system as the main boot entry.
* /Rebuild--Completely re-creates the Boot.ini file. The user must confirm each step.
* /Redirect--Allows the boot operation to be redirected to a specific port when using the Headless Administration feature. The Redirect parameter takes two parameters of its own, [Port Baudrate ] | [UseBiosSettings].
* /Disableredirect--Disables the redirection.

#6: Fix a corrupt partition boot sector

The partition boot sector is a small section of the hard disk partition that contains information about the operating system's file system (NTFS or FAT32), as well as a very small machine language program that is crucial in assisting the operating system as it loads.

If you suspect that Windows XP won't boot because the partition boot sector has been corrupted, you can use a special Recovery Console tool called Fixboot to fix it. Start by booting the system with the Windows XP CD and accessing the Recovery Console as described in #4.

To use the Fixboot tool, from the Recovery Console command prompt, type

Fixboot [drive]:

Where [drive] is the letter of the drive to which you want to write a new partition boot sector.

#7: Fix a corrupt master boot record

The master boot record occupies the first sector on the hard disk and is responsible for initiating the Windows boot procedure. The master boot record contains the partition table for the disk as well as a small program called the master boot code, which is responsible for locating the active, or bootable, partition, in the partition table. Once this occurs, the partition boot sector takes over and begins loading Windows. If the master boot record is corrupt, the partition boot sector can't do its job and Windows won't boot.

If you suspect Windows XP won't boot because the master boot record has been corrupted, you can use the Recovery Console tool Fixmbr to fix it. First, boot the system with the Windows XP CD and access the Recovery Console as described in #4.

To use the Fixmbr tool, from the Recovery Console command prompt, type

Fixmbr [device_name]

Where [device_name] is the device pathname of the drive to which you want to write a new master boot record. For example, the device pathname format for a standard bootable drive C configuration would look like this:

\Device\HardDisk0

#8: Disable automatic restart

When Windows XP encounters a fatal error, the default setting for handling such an error is to automatically reboot the system. If the error occurs while Windows XP is booting, the operating system will become stuck in a reboot cycle--rebooting over and over instead of starting up normally. In that case, you'll need to disable the option for automatically restarting on system failure.

When Windows XP begins to boot up and you see the message Please select the operating system to start or hear the single beep, press [F8] to display the Windows Advanced Options Menu. Then, select the Disable The Automatic Restart On System Failure item and press [Enter]. Now, Windows XP will hang up when it encounters the error and with any luck, it will display a stop message you can use to diagnose the problem.

#9: Restore from a backup

If you can't seem to repair a Windows XP system that won't boot and you have a recent backup, you can restore the system from the backup media. The method you use to restore the system will depend on what backup utility you used, so you'll need to follow the utility's instructions on how to perform a restore operation.

#10: Perform an in-place upgrade

If you can't repair a Windows XP system that won't boot and you don't have a recent backup, you can perform an in-place upgrade. Doing so reinstalls the operating system into the same folder, just as if you were upgrading from one version of Windows to another. An in-place upgrade will usually solve most, if not all, Windows boot problems.

Performing a Windows XP in-place upgrade is pretty straightforward. To begin, insert the Windows XP CD into the drive, restart your system, and boot from the CD. Once the initial preparation is complete, you'll see the Windows XP Setup screen (shown earlier in Figure A). Press [Enter] to launch the Windows XP Setup procedure. In a moment, you'll see the License Agreement page and will need to press [F8] to acknowledge that you agree. Setup will then search the hard disk looking for a previous installation of Windows XP. When it finds the previous installation, you'll see a second Windows XP Setup screen, as shown in Figure C.

Figure C

This screen will prompt you to press R to repair the selected installation or to press [Esc] to install a fresh copy of Windows XP. In this case, initiating a repair operation is synonymous with performing an in-place upgrade, so you'll need to press R. When you do so, Setup will examine the disk drives in the system. It will then begin performing the in-place upgrade.

Keep in mind that after you perform an in-place upgrade or repair installation, you must reinstall all updates to Windows.

Thursday, July 30, 2009

How to Detect Missing DLL File Errors?

When a DLL file is corrupt or missing you may receive an error message similar to the one given below when you run a program that needs to use this DLL file:

Cannot find the file Program_Name.exe.

In the error message Program_Name represents the name of the program or name of one of its components in which the error occurred.

This error message is usually followed by an error message similar to the one given below:

Error starting program. A required .DLL file DLL_Name.DLL was not found.

Here, DLL_Name is the name of the DLL file that is causing the error.

What Causes Missing DLL File Errors?

There can be many causes of missing DLL errors. Some of the most common causes are:

* An essential system file required by the program you are using has been deleted. This may happen when a program is uninstalled/installed or you have tried to clean up space on the hard disk.
* A virus infection has infected the required DLL file.
* DLL entries in the Windows registry are corrupt

How to Fix Missing DLL File Errors

The following are some of the methods that you can use to resolve issues related to missing DLL files.

Method 1: Reinstall the program that is generating the error message.

Reinstalling the program replaces any missing or damaged program files with their original version. This step also helps in rectifying problems in the Windows registry related to this program.

Method 2: Reinstall the recently installed program.

Sometimes, when you uninstall a program, some of the shared DLL files required by other programs on your computer may also get removed. This may lead to missing DLL file errors when you try to use programs that require the removed DLL files.

In this case, the best way to resolve the problem is to reinstall the program you removed. Doing this will copy and register the required files on the system again.

Method 3: Update the program or device driver that you may have installed recently

If you have recently installed a new program or device driver, it is quite likely that some of the existing DLL files are overwritten by their older versions. In this case, to resolve the error, try to search for any updates for this new program. If you find an update, download and install it to try and resolve the error. You may also try to download the newer version of the DLL file from the Internet or another computer with a similar configuration as yours and copy it your computer.

If nothing works, you may need to use the System Restore to revert your system to the time when no error occurred on the PC.

Method 4: Repair your Windows registry

In order to work, all DLL files need to be registered in the Windows registry. If the registry entries related to one or more DLL files are corrupt, missing DLL errors may be generated. To prevent this problem, you must perform registry scan and repair and maintain an error-free registry. To easily perform this task on a regular basis, you may use a reliable registry tool, such as RegGenie.

Method 5: Scan and remove virus infections

Malicious virus infections may cause damage to existing DLL files and generate errors. To resolve this issue, you must use an efficient antivirus tool, such as AntiVirus Plus to perform a full system scan of your computer and remove all malware data from it. An antivirus tool helps in repairing infected files and restoring your computer back to it’s normal working state. Before performing the scan, you must update your antivirus tool. Additionally, it is recommended that you perform the scan in Safe Mode to make it more effective.

How To Fix PPP Error 718?

Error 718: PPP Timeout occurs when you try to connect your PC over a Dial-Up-Network and the connection fails. The following error message may be displayed on your computer screen when you try to connect to a dial-up network using your modem:

Error 718: the computer you're dialing in to cannot establish a Dial-Up Networking connection.Check your password, and then try again.

Additionally, you may receive the following error message:

Error 718: PPP Timeout A PPP conversation was started, but was terminated because the remote computer did not respond within an appropriate time. This can be caused by poor line quality or by a problem at the server.

Note: Point-to-Point Protocol or PPP is a communication protocol used to establish connection between two computers over a serial interface. Usually, PPP is used to connect a personal computer to a server over a phone line with the help of a serial modem. For example, you may use a PPP connection to dial-in and connect to the server of your Internet Service Provider (ISP).

Causes of Error 178

There are several reasons that may prevent a PPP connection from being established and thus generate a PPP error. Some of the common causes are:

* Bad quality phone line.
* Incorrect phone number is used to dial-in to ISP server.
* Incorrect server type settings on the computer.
* Incorrect username or password being used to establish the connection.
* Malfunctioning ISP server.
* Might need to setup initialization string for the modem to establish a stable connection.

Resolution Methods

The solution of error 718 depends on the cause. The following are some of the methods that you can perform the resolve the error:

Method 1: Check the Phone Line

The first task is to ensure that there is no noise on the phone line and the phone line is working properly. You can do this easily by connecting a phone instrument to the phone line. In case you are unable to dial or talk properly over the phone, you will have to contact your phone company for a resolution.

Method 2: Ensure that You Are Using the Correct Number to Dial-In

Error 178 may generate if you are using an incorrect number to dial-in to your ISP’s server. You may contact your ISP or check the documentation that came when you bought the connection to ensure that you are using the correct number.

Method 3: Check your Dial-Up Networking Settings

On your Windows XP computer, open Control Panel, click Network and Internet Connections, click Network Connections, and then double-click on your dial-up connection. On the Connect connectionName dialog box, click the Properties button. Here, open all the tabs and ensure that the settings are as specified by your Internet Service Provider.

You may also try to create a new connection and use it to see if doing this resolves the problem.

Method 4: Ensure Username and Password Are Correct

In order to establish a PPP connection, it is essential to provide the correct username and password that helps you authenticate your ISP’s server.

Therefore, ensure that you are using the correct username and password. If you have forgotten your username and password, you may have to call your ISP support for help.

Method 5: Ensure that the ISP Server is not Malfunctioning

You may also contact your ISP to ensure that their servers are working fine because if the ISP server is down, you will not be able to establish the connection.

Method 6: Upgrade Modem Driver

Corrupt or outdated modem driver files may also generate error 178 on the system. Therefore, it is recommended that you go to the modem manufacturer’s website and then download and install any updated drivers if available.

How to Fix Internet Connection Error 619?

Internet connection error 619 may be generated when you attempt to connect to the Internet on a Microsoft Windows XP computer. When the error occurs, the connection may fail and you will not be able to browse the Internet.

Cause of the Error

There may be several causes of this error. Some the most common ones are given below:

* A third-party program, such as Download Accelerator or Zone Alarm that is not releasing the Winsock stack after performing a particular Internet activity.
* There is a problem with the access numbers of your Internet Server Provider, such as NetZero.
* There is a problem with your modem.
* You are unable to connect your DSL modem through a router, such as a LinkSys router.

Resolution Methods

Most of the time, the error resolves automatically after you restart your computer. If it does not, then depending on the cause, use one of the following methods to fix error 618 problems:

Method 1: Uninstall the third-party program

You may workaround the issue by uninstalling the third-party program that is causing the error.

You may also contact your third-party product manufacturer for any available resolution to the problem.

Method 2: Uninstall the third-party program

If your ISP, such as NetZero has provided you with multiple access numbers, try all of them to make the connection. You may also attempt to use any long distance number, if available to see if it helps you resolve the issue temporarily.

There might be some changes that you may need to make to your dial up configuration according to your local telephony service provider. Some of these changes might be:

* Select the local dialing number according to the place where you are accessing the ISP from.
* Disable call waiting.
* Add any custom prefix or suffix number to the ISP number, if required.
* Ensure with the local telephone company that the numbers you are using to dial to your ISP are local numbers.

Method 3: Remove, reinstall, and then configure your modem

1. Open Device Manager.
2. Expand Modems.
3. Right-click on your modem and select Uninstall.

Note: Use a registry tool, such as RegGenie, to clean your registry and remove any left behind modem entries.
4. Restart your PC.
5. Your system will automatically scan for new hardware and install the new modem. You may need to insert the Windows XP setup or the modem driver CD to make the driver files available to the modem driver installation process.
6. Open Control Panel.
7. Select Network and Internet Connections and then select Phone and Modems in the left pane.
8. Open the Modems tab in the Phone and Modems dialog box.
9. Select your modem and then click Properties.
10. On the Diagnostics tab, click on the Query Modem button.
11. Review the results to ensure that your modem is configured properly. If, there are errors, you may click the Troubleshoot… button on the General tab to launch the Modem troubleshooting wizard and resolve the problem.
12. After you have configured the modem according to your ISP, try to connect to your ISP to ensure that it is working.

Method 4: Resolve issues to connect your DSL Modem through your router.

1. Connect directly to your DSL modem and open the browser configuration page. To do this, open the 192.168.0.1 in a web browser-or the IP address that opens the modems configuration page.
2. Here, click the given option to reset your modem to factory defaults. You may be asked for the modem access code. This code should be mentioned on the bottom of your modem.
3. Close the browser window and reinstall your router.
4. After connecting the router, in your Web browser, open 192.168.1.1 and enter your router password-this is usually ‘admin’ by default.
5. Open the administrator page of your router and use the option provided to reset it to factory defaults.
6. Now, return to the Setup page of your router, select login type as PPP0E, and then enter the userID and password of your DSL modem.
7. Set the Time zone configuration.
8. Save your changes.
9. Setup your Internet or network configuration by performing the required steps.

Note: The steps discussed here are for a LinkSys router.

How to Fix rthdcpl.exe - Illegal System DLL Relocation Error?

You may receive the following error message soon after you have updated your Windows XP PC with Service Pack 2:

Rthdcpl.exe - Illegal System DLL Relocation

The system DLL user32.dll was relocated in memory. The application will not run properly. The relocation occurred because the DLL C:\Windows\System32\Hhctrl.ocx occupied an address range reserved for Windows system DLLs. The vendor supplying the DLL should be contacted for a new DLL.

This error message is displayed when a recent Windows XP update causes some problems with the Realtek HD Audio Control Panel versions1.41, 1.45, 1.49, and 1.57.

Note: You may also encounter this problem if you have ElsterFormular versions 2006 and 2007, TUGZip version 3.4, CD-Tag version 2.27, Suunto Ski Manager versions 1.0.2, 1.1 and 1.2, and BMC PATROL version 7.1 programs on your PC.

Cause of the Error

This problem usually appears after the security updates 925902 (MS07-017) and 928843 (MS07-008) are installed on a Windows XP Service Pack 2 computer. The problem occurs with the program listed above due to conflicting base addresses of the Hhctrl.ocx file included in the security update 928843 and the User32.dll file in security update 925902. The error message is displayed when a program loads the Hhctrl.ocx file before the User32.dll file.

Resolution Method

You may follow the methods listed below to resolve this error message. After each method check if the error is resolved.

Update the Program that is Generating the Error Message

First, try to look for an update for the program that is generating the errors. For example, if the error message indicates a problem with Rthdcpl.exe, try to search for and update the Realtek drivers.

You may try to update to Realtek HD Audio Control Panel 1.64 that does not display this error.

Install Windows Updates

1. Visit the Microsoft Update Web site, and then install all essential updates on your Windows XP Service Pack 2 computer.
2. Check if the error is resolved after the updates are installed. If the error still remains, do the following:
1. Open the Update for Windows XP (KB935448) webpage.
2. Click the Download button-if this button is not available, you may have to first click the Validate button to ensure that your Windows XP Service Pack 2 is genuine and then proceed with the download.
3. Next, click Run.
4. Follow the instructions given on the screen to install the update to your PC.

To prevent errors, such as the “Rthdcpl.exe - Illegal System DLL Relocation” error, it is essential that you keep both Windows and the programs and device drivers installed on your computer updated. On your Windows XP computer, you can turn on the Automatic Updates feature to ensure that all your Microsoft-related products are updated on a regular basis. Also, if the automatic update feature is available with other programs and device drivers, you should enable it to keep these programs updated.

It is also recommended that you use a good Windows registry tool, such as RegGenie, to regularly scan and clean your registry. This will not only help you optimize the performance of your PC, but also help you prevent several unwanted computer errors and problems from occurring.

How to Resolve Error 1053?

The following error message may be displayed and it may take you much longer than normal to stop or pause a managed Microsoft Windows service:

Could not stop the Windows service-name service on Local Computer.
Error 1053: The service did not respond to the start or control request in a timely fashion.

Note: Here, service_name represents that name of the Managed Windows service you are tying to stop or pause.

Cause of the Error

This error usually occurs when there are some problems between the service you are trying to stop/pause and the Advapi32.dll file. This DLL file is part of one of the advanced API services library that supports several APIs that include several security and registry calls.

Technical explanation: When you attempt to stop or pause a service, the OnStop method is directly called by the ServiceBase class directly from the Service common handler. This handler is defined in the ScDispatcherLoop of Advapi32.dll. If this ScDispatcherLoop thread is unable to receive any new service command from the service control manager it is marked as time out and error 1053 is displayed.

Resolution Method

This issue has been identified by Microsoft and is rectified in the latest Microsoft .NET Framework 1.1. To download the latest Microsoft .NET Framework 1.1 service pack, open the “How to obtain Microsoft .NET Framework 1.1 Service Pack 1” Web page and then follow the given instructions.

On your Windows computer you may encounter several errors such as error 1053 that occur due to a programming issue detected after the software program being used was released for commercial use. Microsoft regularly releases hotfixes, patches and service packs to fix these problems. This is the reason why, to ensure that your PC stays trouble-free, you must regularly download and install these updates to your system. The best way to ensure that all your Microsoft products are updated on a regular basis is to enable the Windows Automatic Update feature on your computer.

Additionally, to prevent several other computer errors from occurring on your computer you must maintain a healthy and clean Windows registry with the help of a reliable registry tool, such as RegGenie. Also, use anti-malware tools, such as Anti-Virus Plus and XoftSpySE to ensure that your system stays free from virus and spyware infections.

How To Fix “Setup Was Unable To Find The MSI Package” Error?

If your PC is behind a proxy server, then the following error message may be displayed when you attempt to install a program on your Windows computer:

"Setup was unable to find the MSI package.“

Steps to See Proxy Configuration

To see if your computer is behind a proxy server, perform the following tasks:

1. Open Internet Explorer.
2. On the Tools menu, select Internet Options.
3. Select Connections.
4. On this tab, select the LAN Settings button to check your Internet Connections settings.
5. If the Use proxy server for this connection check box is selected it implies that you are trying to install your software from behind a proxy server.

Workaround Solutions

To workaround this issue, you may use one of the following solutions:

Method 1: Use another connection that connects directly to the Internet.

Many software programs that are installed using the Windows Installer utility start the installation process directly from the Internet. However, your proxy server may not allow this Web activity over the Internet and your installation process may fail.

To workaround, try to connect to the Internet using some other method. For instance, you may try to use a Dial-up Connection or a direct LAN connection that does not require you to go through a proxy server. Also, open Internet Explorer > Tools > Internet Options > Connections > LAN Settings. Here, clear the Use proxy server for this connection check box and then select the Automatic detect settings checkbox. Click OK twice to save your settings.

Method 2: Download the installation files to your system.

If possible, try to download the installation package of the software you are trying to install on your computer and then perform the installation locally.

To do this, perform the following steps:

1. Open Start menu, and then select Run.
2. Type the following command and then press Enter:

msiexec /i http://CompleteURLToProdcutWebsite/DownloadFileName.ms i

Here, CompleteURLToProdcutWebsite represents the URL of the Website from where you are trying to download the software package that is installed using the Windows Installer utility. Additionally, DownloadFileName.msi represents the name of the msi file that installs the software package.

When you run this command, the msi file is downloaded from its Web site and the installation process is carried out locally on your computer.

Troubleshooting Memory Problems In System

It is fairly common for computer users to come across problems associated with memory. These problems can be resolved if computer users are aware of troubleshooting methods and are able to correctly diagnose them on their own.

One of the first steps in troubleshooting memory-related problems is to ensure that the origin of the problem is really the memory. To do this, you may start by asking the following questions:

1. Have you recently purchased your PC? If the problem is encountered on a new PC, it may be a good idea to contact the vendor for fixing the problem because the system might still be under warranty.
2. Have you upgraded memory by adding new memory chips? Quite often, memory errors occur if we add incompatible or faulty chips. If this is the case, you may resolve the error by replacing the problematic chips. Also, you must ensure that your memory chips are properly seated in their slots.
3. Have you recently installed a new software? If your answer is yes, then it is quite likely that this new software is behind all the errors. In this case, ensure that all the latest updates and patches are installed. At times, problems may occur if the program was not installed properly. If this is the case, then re-installing the software may resolve the error. Also, if you are trying to run a memory-intensive software on an older system, you may face problems. In this case, you may either have to uninstall your software or upgrade your PC.
4. Have you recently installed a new hardware? If a new hardware has been recently installed or removed from the machine, one must check whether there are any loose connections or if the new hardware is working properly.

If the above potential causes have been eliminated, then one must start to investigate the possibility of memory problems. The common symptoms of memory problems and their troubleshooting tips are listed below:

Symptom: Blank Screen

Troubleshooting Tips:

1. Confirm that the VGA card and memory chips are installed properly.
2. Make sure that the motherboard and memory chips are compatible with each other.

Symptom: PC hangs or reboots again

Troubleshooting Tips:

1. Verify whether the computer has adequate memory.
2. Check if there is any fault in the power supply.
3. Make sure that there is no corrosion between memory chip and socket.

Symptom: Your computer reports memory problems

Troubleshooting Tips:

1. Check your CMOS settings to check for “memory mismatch” errors.
2. Memory chips are incompatible-in this case, you may also encounter problems comprising information related to memory address error, memory failure, memory parity interrupt, and memory verification error. The best way to check for incompatible memory is to remove the new chips to see if the error goes away. If it does, you may have to get new compatible memory chips.

Symptom: Your computer enters General protection fault.

Troubleshooting Tips:

1. Reboot your system because this problem usually occurs when two software programs are trying to access the same memory resource.
2. If the problems occurs soon after adding new memory chips then replace these chips with compatible ones to resolve the error.

At times, memory related problems may also occur if your registry is damaged or your hard disk is filled up and cluttered. You can fix registry problems with the help of reliable registry tool, such as RegGenie. To fix your hard disk problems, you may use the Disk Cleanup and Disk Defragmenter tools that come with your Windows operating system. On Windows Vista, you may also use the Memory Diagnostics tool that comes with the operating system to check your memory chips and identify the problems.

Monday, July 27, 2009

Windows Installer 3.1 Upgrade Problems

If you have Windows Installer 3.1 on your computer, then the installation of a Microsoft Windows Installer (.msi) package may fail if the installer attempts to install a more current version of a system file that is being protected by the Windows File Protection (WFP) feature. Additionally, you may notice Windows Installer Error 1931 is added to the Windows Installer log or the Application log

Additional Information: WFP is a feature that helps in protecting Windows operating systems and other program files, usually with file name extensions, .dll, .exe, .ocx, and .sys. Some True Type fonts may also be protected by the feature. Primarily, file signatures and catalog files are used to ensure that the files being protected are correct Microsoft versions. WFP allows these files to be replaced only when a hotfix is installed by using the Update.exe or HOtfix.exe, or if the Operating System is upgraded using Winnt32.exe or a Windows Update is performed.

Cause of the Error

Windows Installers that were released before the version 3.1 allowed the silent installation process to continue even if the software package you were trying to install failed to install a later version of the file that was protected by WFP.

However, this behavior changed with Windows Installer 3.1. If the silent installation process fails to update a file that is protected by WFP, the installation process rolls back.

Resolution Method

The resolution methods for this issue depend on whether you are the end user of a package being installed or you are the developer who is creating the Windows Installer Package that is generating the problem.

Method 1: Use this method if you are the end user of the installation package.

This error usually occurs if you have the Windows Installer 3.1 version 1 installed on your PC. To check the version of Windows Installer on your computer, perform the following steps:

1. Open Windows Explorer.
2. Navigate to the C:\Window\System32 folder.

Note: Here, C: represents the system root folder in which your Windows is installed.

1. Here, locate the Msi.dll file and then right-click on it.
2. Select Properties.
3. Open the Version tab.
* If the file version is 3.1.4000.1823, it implies that you have Windows Installer 3.1 version 1 on your computer.
* If the file version is 3.1.4000.2435, it implies that you have Windows Installer 3.1 version 2 on your computer.

If you have Windows Installer 3.1 version 1 on the system, then you will have to upgrade to version 2 to repair the error. To do this, open the 893803 (http://support.microsoft.com/kb/893803/) Windows Installer 3.1 (v2) Web page and then download and install the update on your computer.

Method 1: Use this method if you are creating a Windows Installer package.

When creating an installer package for your application, it is recommended that in the Windows Installer database you create, that you set a condition that prevents WFP-components from installing on computers with the WFP feature.

For more information on how to set the condition, you may refer to the Microsoft MSDN Web site.

Repair Windows 2000 STOP: 0x0000002E Error Message

The following stop error may generate on your Windows 2000 computer due to a hardware problem:

“STOP: 0x0000002E (parameter1, parameter2, parameter3, parameter4)
DATA_BUS_ERROR”

Here,

Parameter 1 displays the virtual address due to which the fault occurred.
Parameter 2 displays the physical address due to which the fault occurred.
Parameter 3 depicts Processor Status Register (PSR).
Parameter 4 depicts Faulting Instruction Register (FIR).

Cause of the Error

The error message usually indicates a parity error in the system memory or RAM. The following are some of the items that are known to generate the stop error:

* Failure or defects in hardware components, especially in defective RAM chips, video RAM and L2 RAM cache.
* Incompatible or mismatched hardware components. For instance, you may have RAM chips with different speeds on the same system.
* A buggy driver trying to access the 0x8xxxxxxx address range that does not map to a real physical address.
* Virus infection in the Master Boot Record (MBR).
* Physical problems with the hard disk.

Resolution Methods

1. If the error starts appearing soon after you add a new hardware, remove it, to check if the error is resolved. If it is, then there is some problem with the new hardware-it is either defective or is not compatible with your system.
2. Use the hardware diagnostics utility to check if the error has occurred due to an existing hardware on your computer. On Windows Vista, you may use the memory diagnostics utility to run tests and ensure that all your RAM chips are working fine. If an error is reported, you may have to get the faulty hardware repaired or replaced to resolve the stop error.
3. If the error still remains, open up your PC and check that all hardware adaptors and cable connectors are properly seated in their slots. You may also clean the hardware components to remove any dust deposits from them.
4. If you encounter an error on a new system, then ensure that BIOS and driver updates have been installed. A new PC is usually under warranty. Therefore, you may even contact your PC vendor for a solution.
5. If the stop error follows are recent new driver installation or driver update, then this new driver might be buggy and causing the error. In this case, it is recommended that you uninstall this buggy driver and replace it with an error-free driver. You may refer to the System log in the Event Viewer utility to determine the driver that is generating the error. In case the error occurs during the startup process, then you can uninstall it by starting your PC in Safe mode. Finally, if the driver generating the error is part of the PC boot process and you have an NTFS partition on the hard disk, then you may remove the driver by using the Command Console.
6. If a damaged file is causing the error, then you may run the ‘chkdsk /f/r’ command to check your hard disk for errors and fix them. You will have to restart your computer to enable the chkdsk command to perform the task.
7. To check if a virus in the MBR is generating the error, you may use a good antivirus software, such as Antivirus Plus to scan the MBR and remove any virus from it. You may also choose to use a good registry cleaner tool, such as RegGenie to ensure that your registry is healthy and no incorrect or malicious entry within it is behind the errors.
8. If the above methods do not work, try disabling caching-including BIOS cache, internal/external cache, L2 cache, and write-back cache, Shadowing, and BIOS-enabled virus protection feature in CMOS.
9. Lastly, if everything fails, get your motherboard examined for any physical problems. If there are any problems, it is best to replace the motherboard.

Thursday, July 23, 2009

Windows 7 Review, Should You Upgrade?

Now that Microsoft is all set to release its much anticipated version of its new operating system, Windows 7, the big question is – Is it worth making the change? Well, if the new features and improvements incorporated in the Windows 7 Release Candidate1 is any indication to go by then the jump to Windows 7 will in fact be worth making.

Windows 7 RC1 (Release Candidate) has shown that Microsoft does not intend to make any earth-shaking changes but has instead opted to fine-tune the operating system to improve productivity and overall usefulness.

Microsoft has announced that Windows 7 will include a feature called Windows XP Mode, which will run XP applications in an XP compatibility box, but to users it will appear as if the applications are running directly in Windows 7. If Microsoft does include this feature (This feature was not included in Windows7 RC1), then it will give the Windows users best of both worlds. XP users can opt for Windows 7 and take advantage of its numerous new features and also run XP as if it were part of Windows 7.

Windows 7 RC1 is a faster and more efficient operating system than the previous Windows versions. It also includes a number of subtle user-interface changes. For instance, the task bar adopts a new feature that Microsoft calls “task bar thumbnail overflow”. Numerous files that are opened in a particular application can be viewed by moving the mouse over its icon on your taskbar. With this feature, when you highlight any file on the list you get a peek at the highlighted window. Also, you can close the window by clicking a small “X”, similar to the thumbnail view.

People who prefer to use the keyboard over the mouse will welcome a new keyboard shortcut for the taskbar that makes it easier for users to jump to an individual window in an application without using the mouse. In addition to the above two points, there are many other useful features that have been included in the Windows 7 RC1 taskbar.

Other user-interface changes include a much improved Windows Explorer and file search utility. For instance, when you search for a file, pieces of information from the file searched are displayed, which is quite helpful in determining whether this file is the one you are looking for or not.

Microsoft has also done a few desktop tweaks in Windows 7 RC1, making it more attractive and useful. All the desktop backgrounds included are quite attractive and entertaining. In Windows RC1, you also have the option to hide the desktop icons and gadgets.

Windows 7 RC1 also includes a few networking improvements that previous versions of Windows PCs lacked. The most notable is the use of option called “HomeGroups”, which provides structure to the process of sharing devices, media files and other files over a home network.

All in all it will be correct to say that Windows 7 RC1 is a much quicker, efficient and attractive operating system when compared to the previous Windows versions and it will be worth investing money in upgrading your PC to Windows 7 when it is released.